Understanding Balsa Wood Bridges
A balsa wood bridge is a popular structure used in STEM challenges to engage students in the principles of engineering and design. Made primarily from lightweight balsa wood, this type of bridge allows students to experiment with construction techniques while considering weight, load, and structural efficiency. Through this challenge, educators can provide a hands-on learning experience that stimulates critical thinking.
Designing and Building Your Bridge
The process of constructing a balsa wood bridge begins with a solid design. Students should research various bridge types, such as beam, arch, or truss, to understand their benefits and limitations. After selecting a design, they can sketch a blueprint, considering factors like dimensions and load distribution. Once the design is finalized, students can cut the balsa wood to the required lengths and start assembling the bridge using a strong adhesive. It is crucial to ensure that joints are secure as they are vital to the bridge’s overall integrity.
If you click this link and make a purchase, we earn a commission at no additional cost to you.
Primary Materials
- Balsa Wood: https://amzn.to/4eLHohp
- Super Glue or Wood Glue: https://amzn.to/4eVJCep
- Foam Board: https://amzn.to/401ykAD
- Craft Knife or Razor Blade: https://amzn.to/3YmekaD
- Fine Sandpaper 220 Grit or Higher: https://amzn.to/3zW7EGE

- PERFECT FOR MODEL PROJECTS. These balsa wood strips are the ideal tool to assist in model builds suc…
- MADE FOR COMPETITION. Use these balsa wood strips for classroom, local, state, and national bridge b…
- QUANTITIES. This kit includes 50 pieces of balsa wood strips.
- SPECS. These balsa wood strips measure 1/8″ x 1/8″ x 36″. They can be cut down to your desired lengt…

- Need a sharper, cleaner cutting edge? Each blade is double honed for excellent cutting potential, a customer favorite ti…
- Single edge razor blades are constructed from stainless steel honed for sharpness. These utility knife blades offer high…
- These steel single edge blades are great for general scraping and box cutting applications at a great value price. Super…
- Razor blade can also be used in many applications with a variety of standard blade tools. These blades are used in a wid…

- Pencils: https://amzn.to/4eJ416i
- Cutting Mat: https://amzn.to/4f3rtuO
- Ruler or Metal Straightedge: https://amzn.to/400jOc6
- Small Pins: https://amzn.to/3YjqvVE
- Parchment Paper: https://amzn.to/4eImxLW
How to construct a balsa wood bridge?
1. Understanding the Project Requirements:
- Carefully read the rules and guidelines for the bridge-building project, including dimension requirements and weight limits. This will ensure that your design meets all.
2. Design Your Bridge:
- Use a digital tool such as Google Slides, PowerPoint, or Microsoft Publisher to create a detailed design of your bridge. Be sure to include all measurements and angles, and consider the load distribution and structural integrity. Some of the popular bridge designs are the Howe Truss, Pratt Truss, Warren Truss, K Truss, and Baltimore Truss.
3. Print and Prepare the Design:
- Print out your bridge design on paper. If possible, use a scale that matches the actual size of the bridge to make the construction process easier.
4. Set Up Your Workspace:
- Place the printed design on a foam board. Ensure it is flat and secure.
- Lay a sheet of parchment or wax paper over the printed design. This will prevent the glue from sticking to the paper and foam board.
- Secure the parchment or wax paper to the foam board using clear tape or pins, making sure it is smooth and wrinkle-free.

- Impact Tough: Reinforced to increase impact resistance and strength
- Anti Clog Cap: Keeps glue from drying out. It’s Gorilla Tough use after use
- Fast-setting: Dries in 10-45 seconds, no clamping required
- Versatile: Bonds plastic, wood, metal, ceramic, rubber, leather, paper, and more
5. Prepare the Balsa Wood Sticks:
- Using a sharp blade or hobby knife, cut the balsa wood sticks according to the lengths required in your design. Be precise with your cuts to ensure the sticks fit together well.
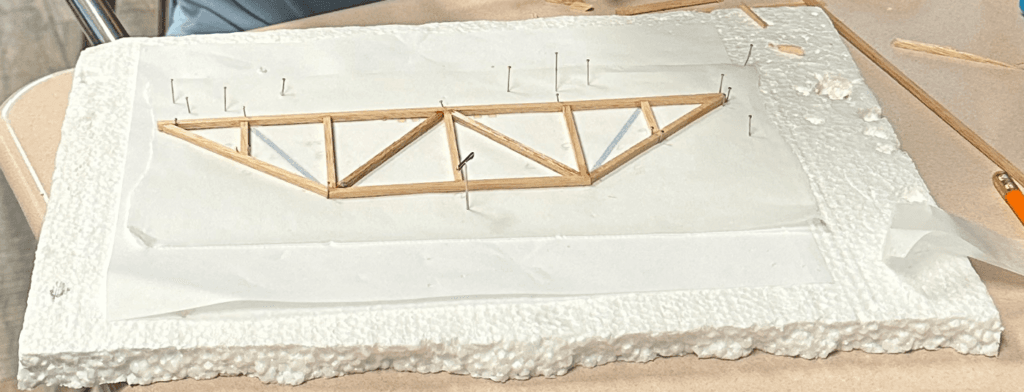
6. Begin Constructing One Side of the Bridge:
- Place the cut balsa wood sticks on top of your design, aligning them carefully with the printed lines.
- Use pins to secure the sticks to the foam board, ensuring they stay in place and maintain the correct shape and alignment.
- Apply a small amount of glue at each joint where the balsa wood sticks meet. Use minimal glue to avoid excess and ensure clean connections. Allow the glue to dry completely before moving on to the next step.
7. Construct the Second Side of the Bridge:
- Repeat the same process for the second side of the bridge. Make sure both sides are identical in shape and size for symmetry and structural balance.
- Allow the second side to dry completely before proceeding.
8. Align and Connect Both Sides of the Bridge:
- Once both sides are fully constructed and the glue is dry, carefully remove them from the foam board.
- Align the two sides vertically on the foam board, ensuring they are parallel and balanced.
- Use pins to hold the sides in place temporarily while you work on connecting them.

9. Add Cross Members and Reinforcements:
- Cut additional balsa wood sticks to the required lengths for the cross members that will connect the two sides of the bridge.
- Apply a small amount of glue to the ends of each cross member and attach them between the two sides, ensuring they are evenly spaced and level.
- Continue adding cross members until the bridge structure is fully connected. Be sure to check the alignment frequently to maintain the correct shape.
10. Final Touches and Reinforcement:
- Inspect the entire bridge for any weak joints or areas that may need additional reinforcement.
- Add extra glue or small balsa wood pieces as needed to strengthen the bridge structure.

- Foam Insulation Boards: Use this 6-pack of white foam sheets for faux flower arrangements, Halloween and Christmas decor…
- Insulation Solution: Enhance the comfort of your outdoor pet house with these insulation foam boards for projects; their…
- Smooth Surface: The surface of these foam board sheets provides a professional finish to your artwork, providing an idea…
- For Any Occasion: Decorate the foam rectangle boards to create one-of-a-kind centerpieces for an upcoming wedding, baby …
Evaluating Efficiency in Bridge Construction
After completing the construction, it’s time to evaluate the bridge’s effectiveness. Efficiency is determined by calculating the load capacity divided by the mass of the bridge. Conducting load tests can help measure how much weight the bridge can support before failure. This evaluation not only helps students understand the practical applications of mathematical concepts but also allows them to reflect on their design choices, thus fostering a deeper understanding of engineering principles in the context of STEM challenges.
MOST Stem Challenges Bridge Challenge: for more information click here
Watch this video before you build the Bridge